Thursday, April 9, 2009

How to re-register the nameservers from godaddy.com!

In computing, a name server (also called nameserver or DNS server) consists of a program or computer server that implements a name-service protocol. It will normally map (i.e. connect) a human-recognisable identifier of a host (for example, the domain name 'en.wikipedia.org') to its computer-recognisable identifier (such as the Internet Protocol (IP) address 145.97.39.155), and vice versa.

We can re-register the nameservers to a different ip's , if we need so. Here are the simple steps to re-register the nameservers from godaddy.com

1)login to godaddy.com

2)click on 'my domains'

3)select your domain name

4)unlock the domain by clicking the lock symbol.

5)then clilck on your domain name

6)navigate to host summary and click on 'edit'

7)insert your new ip assigned for the nameserver,save. you can edit the second nameserver to update the ip.

The 'whois' record will be changed to the new nameserver assigned. You can 'host' to the nameservers to check whether the ip's are updated.
tell2humanlinux@gmail.com

Wednesday, April 8, 2009

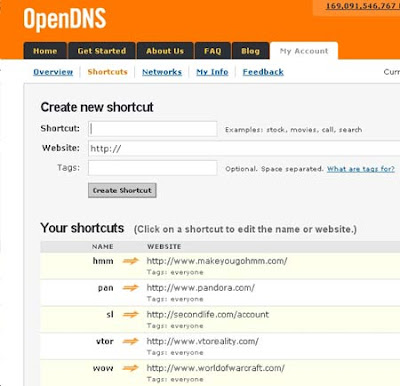
OpenDNS!


OpenDNS offers DNS resolution for consumers and businesses as an alternative to using their Internet service provider's DNS servers. By placing company servers in strategic locations and employing a large cache of the domain names, OpenDNS usually processes queries much more quickly, thereby increasing page retrieval speed. DNS query results are sometimes cached by the local operating system and/or applications, so this speed increase may not be noticeable with every request, but only with requests that are not stored in a local cache.

Other features include a phishing filter, domain blocking and typo correction (for example, typing wikipedia.og instead of wikipedia.org). By collecting a list of malicious sites, OpenDNS blocks access to these sites when a user tries to access them through their service. OpenDNS recently launched Phishtank, where users around the world can submit and review suspected phishing sites.

OpenDNS is not, as its name might seem to imply, open source software.

OpenDNS earns a portion of its revenue by resolving a domain name to an OpenDNS server when the name is not otherwise defined in DNS. This has the effect that if a user types a nonexistent name in a URL in a web browser, the user sees an OpenDNS search page. Advertisers pay OpenDNS to have advertisements for their sites on this page. While this behavior is similar to VeriSign's previous Site Finder or the redirects many ISP's are placing on their own DNS servers, OpenDNS states that it is not the same, as OpenDNS is purely an opt-in service (compared to Site Finder's effect on the entire Internet, as VeriSign is an authoritative registry operator) and that the advertising revenue pays for the customized DNS service. Note that web browsers are not the only users of DNS resolution service and for any other user, this way of resolving names is at best useless, and may be worse than replying that the name does not exist, as is normal.

According to OpenDNS, it may in the future provide additional services that run on top of its enhanced DNS service, and may charge money for some of them.

One example of such an added service was the company's April 22, 2007 launch of "shortcuts", letting users make custom DNS mappings, such as mapping "mail" to "mail.yahoo.com". This feature launch was covered by a large number of publications, including the New York Times, Wired, and PC World.

On May 13, 2007, OpenDNS launched a new domain blocking service which provides the ability to block/filter web sites visited based upon categories. This provides for corporate, educational and parental control over the type of sites that are deemed appropriate by the networks owner. On August 9, 2007 OpenDNS added the ability to override the filter through individually managed blacklists and whitelists. On February 20, 2008 in an effort to make their domain block list current with new website additions OpenDNS changed from a closed list of blocked domains to a community driven list whereby individual OpenDNS subscribers can suggest sites for blocking. If a sufficient number of other subscribers concur with the categorization of the site it is added to the appropriate category for blocking. The threshold of votes required to add a new site to the filter has not been disclosed. Over 50 categories now exist for categorizing websites providing for fine grained control over web browsing habits.

visit the official site:- http://www.opendns.com/

the details to setup openDNS is provided in the website.

tell2humanlinux@gmail.com

Friday, April 3, 2009

How to set the Google repository for gnu/Linux.


Google's Linux software repositories make it easier to download and stay up-to-date with current releases of Google Linux applications.First, we have to use rpm to install the key. Here are the steps to do!

Command line configuration for RPM.

On an RPM-based system (Fedora, SUSE, Mandriva, RHEL, etc.), download the key and then use rpm to install it.

Run these commands as root:

1) wget https://dl-ssl.google.com/linux/linux_signing_key.pub
2) rpm --import linux_signing_key.pub

You can verify the key installation by running:

3) rpm -qi gpg-pubkey-7fac5991-4615767f

To manually verify an RPM package, you can run the command:

4) rpm --checksig -v packagename.rpm


Command line configuration for YUM

As root, create a file 'google.repo' in /etc/yum.repos.d/ and add the following lines to it.

[google]
name=Google - i386
baseurl=http://dl.google.com/linux/rpm/stable/i386
enabled=1
gpgcheck=1

If your .repo file contains gpgcheck=1, signatures will automatically be verified during installation.

If you are running a 64-bit distribution, you should also add the x86_64 repository, which will provide you with native 64-bit versions of some of google's software:

[google64]
name=Google - x86_64
baseurl=http://dl.google.com/linux/rpm/stable/x86_64
enabled=1
gpgcheck=1

You can then use yum as usual, e.g.

yum install picasa
yum install desktop-backgrounds-basic
tell2humanlinux@gmail.com

Faster YUM search!

Yum fastest mirror plugin (yum-plugin-fastestmirror) allow yum to select the closest and freshest mirror around you for your yum update. Once the yum fastest mirror plugin is activated, whenever you perform yum update or install, you will get a better connection. As yum will search the mirror based on your IP thru the GeoIP system. Yum select the fastest mirror based on:-

1. The connecting location of the client.
2. The current freshness/staleness of the mirrors for that region.

yum fastest mirror plugin (yum-plugin-fastestmirror) sound interesting? Want to try?
To install yum fastest mirror plugin (yum-plugin-fastestmirror) you can use this command:-

yum install yum-plugin-fastestmirror
or
yum install yum-fastestmirror

Once the installation completed, you have to edit the file /etc/yum.conf and add the following line to the file:

plugins=1

If it is already there , no need to add!

Done. you have just installed yum fastest mirror plugin.
if you perform yum install or yum update now,
you will notice there is a new line added like below

Loading “fastestmirror” plugin
Setting up Install Process
Setting up repositories

Happy yumming!

tell2humanlinux@gmail.com

Wednesday, April 1, 2009

How to transfer website between two VPS's!

How to transfer a Website from one to cPanel VPS to Another cPanel VPS?

lets say you find a new Hosting Provider however they don’t support you in transferring your old data or website from your Old VPS here is what you need to do.

First you have to make sure that you have cPanel installed on both the New and the Old VPS. Then only with the click of a few buttons you can transfer your complete website to your New VPS. Hope both have the cPanel installed!

1)Login to your Old VPS with the root username and password for e.g:

http://100.100.00.00:2082 or http://100.100.00.00/cpanel

Type the user name & password! ,u have to :) !
username - your username
password- your password

2)Go to Backup’s option in the cPanel Menu and then click on the “Download or Generate a Full Backup” option.

Then under Generate a Full Backup option find the Backup Destination and select the Home Directory

under the option Enter Email Address: enter your email address.

Then click on the generate backup button.

Once the back up is generated you will receive a notification on your email address specified earlier.

3)Then go to the File Manager option on your cPanel and there go to the Home Directory >> /home/username and here you will find the backup that was just generated for you in the following format “backup-11.03.2008_18-06-35_username.tar.gz”

4)Select the backup file and Move it to the public_html directory and then click on the public_html and you will see the backup there.

5)Now change the file permission for the Backup file to 644.

6)Now once this is done login to the New VPS and go to the path where the backup is supposed to be downloaded.

7)Now to get the backup from the old server use the “wget” command in the following way.

wget -c http://the pld VPS ip/~old vps username/backup-11.03.2008_18-06-35_username.tar.gz

8)Then once this is done all you need to do is restore the backup Folder.

To restore the backup,type :-

/scripts/restorepkg --force username


The account restoration process will begin, this will take a long time & the backup process will also consumes a long time.

thankyou
mail me @ tell2humanlinux@gmail.com


Opera Browser installation in GNU/Linux


Here i am discussing the step-by-step process to install Opera Browser in GNU/Linux:-

I am installing Opera/9.64 (X11; Linux i686; U; en) Presto/2.1.1 in Redhat linux/Centos 5 Version

1)Download the opera from the folowing url

http://www.opera.com/browser/download/

Select distribution and vendor as Redhat 5 or your current version

And check the box : Download this package in TAR.GZ format

Click on DOWNLOAD OPERA

2) The download begins

after completion,goto the downloaded location

Move it to the home
Create a directory 'opera'
mkdir opera

move the downloaded package to opera

mv opera-9.64.gcc4-shared-qt3.i386.tar.gz opera

3)Extract the package using the following command

tar xzf opera-9.64.gcc4-shared-qt3.i386.tar.gz

4)then open the directory opera

cd opera

list the files

ls

you can see some files & Folders

You can see one named install.sh

5)type

./install.sh

It starts the instalations process

It ask for the confirmation

Type 'y' to complete the instllation.

6)After the  instllation,the Opera opens up

For the next time if you want to browse using Opera

7)Click on Application->internet->Opera

mail me at :- tell2humanlinux@gmail.com