Sunday, October 18, 2009
Tuesday, July 21, 2009
FIX : Unable to open pty: No such file or directory
While trying to SSH or enter into a VPS from the node, you may get the following error :
Unable to open pty: No such file or directory
or
root@tip~]# vzctl enter 900
enter into VE 900 failed
Unable to open pty: No such file or directory
There is a temporary and permenant fix for this issue.
Temporary Fix :-
Execute the following commands from the node
vzctl exec VEID /sbin/MAKEDEV pty
vzctl exec VEID /sbin/MAKEDEV tty
vzctl enter VEID
Where VEID is the VPS id.
Permanent Fix :-
First temporarly fix the issue and enter into the VPS.
1) vzctl enter VEID
2) Edit the file /etc/rc.sysinit of the VPS
vi /etc/rc.sysini
3) Search for the line /sbin/start_udev and comment it
#/sbin/start_udev
4) Add the following two lines under /sbin/start_udev
#/sbin/start_udev/sbin/MAKEDEV tty/sbin/MAKEDEV pty
5) Reboot the VPS and you are done!
vzctl restart VEID
Thursday, June 18, 2009
Saturday, May 23, 2009
How to enable log rotation on Linux ?
The default configuration file is /etc/logrotate.conf
# see "man logrotate" for details
# rotate log files weekly
weekly
# keep 4 weeks worth of backlogs
rotate 4
# create new (empty) log files after rotating old ones
create
# uncomment this if you want your log files compressed
#compress
# RPM packages drop log rotation information into this directory
include /etc/logrotate.d
# no packages own wtmp -- we'll rotate them here
/var/log/wtmp {
monthly
minsize 1M
create 0664 root utmp
rotate 1
}
# system-specific logs may be also be configured here.
Service or server specific configurations stored in /etc/logrotate.d directory, for example here is sample apache logrotate configuration file:
less /etc/logrotate.d/httpd
/var/log/httpd/*log {Now you need to set a cronjob for the logrotation to run. crontab -e
monthly
rotate 52
compress
missingok
notifempty
sharedscripts
postrotate
/sbin/service httpd reload > /dev/null 2>/dev/null || true
endscript
}
00 00 * * * /usr/sbin/logrotate -s /home/humanlinux/config/logrotate.status
Cron ensures that the command runs at midnight everyday. The command has three parts. /usr/sbin/logrotate is the path to logrotate. The -s /home/humanlinux/config/logrotate.status option specifies where logrotate keeps its status information. This file has to be writeable by the user running the cron.
run the command
/usr/sbin/logrotate -f /etc/logrotate.conf to begin the log rotationThanks & Regards
tell2humanlinux@gmail.com
How to create a shutdown button on a Linux desktop.
Open your favorite text editor
eg : vi shutdown or
: gedit shutdown
append the following lines
#!/bin/bash
poweroff
save and quit. Move the file location to your desktop
chmod 777 shutdown
chmod +x shutdown (made the file 'shutdown' executable)
Now double click on your 'My Computer" icon to open the file browser window.
goto Edit-->Preferences-->Behavior-->Run executable text files when they are clicked-->close
Now you can double click on the 'shutdown' file to shutdown the machine. You can rightclick on it to choose an appropriate icon for the button.
Friday, May 15, 2009
How to assign swap area in Linux to increase speed?
We can assign swap area in linux either on a partition or a file.
I am creating here swap area using a file.
First we need to create the swap file.
dd if=/dev/zero of=/swapfile bs=1024 count=2000000
this will create a file 'swapfile' under / of size above 2gb
Type the following commands :-
mkswap /swapfile
swapon /swapfile
Now we can add the swap entry on fstab so that on every reboot, system will automatically loads the awap area.
vi /etc/fstab
append the following line to the bottom
/swapfile swap swap defaults 0 0
save and quit
To see the swap usage use the command top
thanks & regards
tell2humanlinux@gmail.com
Thursday, May 14, 2009
How to reset the lxadmin password?
How to put the grub password in linux!
Here are the steps to put the grub password.
1) open the command prompt and type the following commands
2) grub
3) md5crypt
4) type the password
5) copy the encrypted password generated
6) Ctrl c
7) vi /boot/grub/grub.conf
8) paste the following line just above the 'title'
password --md5 "encrypted password here"
9) save and quit. Done.
I have give the sample grub file here.
======================================
#boot=/dev/hdb
default=0
timeout=15
splashimage=(hd1,8)/boot/grub/splash.xpm.gz
hiddenmenu
password --md5 %&mkj89(*$*J)$OO*=*
title CentOS (2.6.18-92.el5)
root (hd1,8)
kernel /boot/vmlinuz-2.6.18-92.el5 ro root=LABEL=/ rhgb quiet
initrd /boot/initrd-2.6.18-92.el5.img
======================================
thanks & regards
tell2humanlinux@gmail.com
Saturday, May 9, 2009
How to install flash player on centos/redhat linux !
Installing the flash player on centos/redhat linux seems to be very difficult sometimes. But the installation is quite simple :). The flash player may not be installed automatically using firefox. While trying install firefox, you may get the error following error " Firefox could not install this item because "install-0zr..rdf" (provided by the item) is not well-formed or does not exist. Please contact the author about this problem."The Screeshot of error is provided. To fix this issue, you need to upgrade/install certain libraries using yum. I have mentioned the commands below.
1. First you need to install those libraries (.i386 and .x86_64):
yum install curl compat-libstdc++-33 glibc nspluginwrapper
2. Once done with the libraries, we need to download the flash player rpm.
mkdir flash
cd flash
download the rpm inside the folder flash.
click here to Download
3. Next we need to execute the command below to install the rpm. This command should be executed inside the folder, where the rpm is downloaded. Ours is in the folder 'flash'.
rpm -ivh flash-plugin-10.0.12.36-release.i386.rpm
(replace with the version of rpm you have downloaded)
4. Close the Firefox and restart it. You should be able to see the flashes hereafter.
thanks & regards
tell2humanlinux@gmail.com
Thursday, May 7, 2009
How to browse files in an ISO image?
Its always easy to do things using the command lines in Linux. To browse files of an ISO image is an easy task in Linux. Open a terminal window and type in the following commands.
sudo mkdir /media/iso
sudo modprobe loop
sudo mount filename.iso /media/iso -t iso9660 -o loop
cd /media/iso
Hereafter you will be able to navigate to the /media/iso folder and see the contents of the ISO image. To unmount the ISO, use the following command:
sudo umount /media/iso
I will explain the commands and options used specificly:
sudo modprobe loop ->loads/ installs the module for loopback file system support
iso9660 -> the file system used by CD roms
-t -> specify the file system type
-o loop -> for additional options while using a loopback filesystem
thanks & regards
tell2humanlinux@gmail.com
How to change the default text editor in ubuntu!
update-alternatives -- config editor
once this command is entered, it asks to enter the no: of our favourite editor. eg:
humanlinux@localhost:~# update-alternatives --config editor
======================================
There are 3 alternatives which provide `editor'.
Selection Alternative
-----------------------------------------------
1 /usr/bin/vim.tiny
2 /bin/ed
*+ 3 /bin/nano
======================================
Just enter the corresponding no: of your favourite editor.
Here i have choosed 1.
======================================
Press enter to keep the default[*], or type selection number: 1
Using '/usr/bin/vim.tiny' to provide 'editor'.
======================================
thanks & regards
tell2humanlinux@gmail.com
Tuesday, May 5, 2009
how to install csf in ubuntu / linux servers!
CSF is a firewall that can be installed on linux based severs to enhance the security. It can be installed even on a server based on cPanel. It can be configured to find out hacking attempts through ssh etc. Can be used for ip whitelisting and blacklisting.
The csf instllation is quite easy. Just follow the documentation I have given below.
1)Create a folder 'csf'
mkdir csf
cd csf
2)Download the csf into this directory and instal.
wget http://www.configserver.com/free/csf.tgz
tar -xzf csf.tgz
cd csf
sh install.sh
3)Now we need to test whether we have the required iptables modules in the system
perl /etc/csf/csftest.pl
you may get a result like this
======================================================================================
root@humanlinux-desktop:/home/hlinux/Downloads/csf/csf# perl /etc/csf/csftest.pl
Testing ip_tables/iptable_filter...OK
Testing ipt_LOG...OK
Testing ipt_multiport/xt_multiport...OK
Testing ipt_REJECT...OK
Testing ipt_state/xt_state...OK
Testing ipt_limit/xt_limit...OK
Testing ipt_recent...OK
Testing ipt_owner...OK
Testing iptable_nat/ipt_REDIRECT...OK
RESULT: csf should function on this server
=======================================================================================
Don't worry if you cannot run all the features, so long as the script doesn't
report any FATAL errors
4)You should not run any other iptables firewall configuration script. For
example, if you previously used APF+BFD you can remove the combination (which
you will need to do if you have them installed otherwise they will conflict
horribly):
sh /etc/csf/remove_apf_bfd.sh
5)That's it. You can then configure csf and lfd by edit the files
directly in /etc/csf/*, or on cPanel servers use the WHM UI
csf installation for cPanel is preconfigured to work on a cPanel server with all
the standard cPanel ports open.
csf installation for DirectAdmin is preconfigured to work on a DirectAdmin
server with all the standard DirectAdmin ports open.
csf auto-configures your SSH port on installation where it's running on a non-
standard port.
csf auto-whitelists your connected IP address where possible on installation.
You should ensure that kernel logging daemon (klogd) is enabled. Typically, VPS
servers have this disabled and you should check /etc/init.d/syslog and make
sure that any klogd lines are not commented out. If you change the file,
remember to restart syslog.
See the readme.txt file for more information.
Webmin Module Installation/Upgrade:-
To install or upgrade the csf webmin module:
Install csf as above
Install the csf webmin module in:
Webmin > Webmin Configuration > Webmin Modules >
From local file > /etc/csf/csfwebmin.tgz > Install Module
Uninstallation of CSF :( :-
Removing csf and lfd is even more simple:
On cPanel servers:
cd /etc/csf
sh uninstall.sh
On DirectAdmin servers:
cd /etc/csf
sh uninstall.directadmin.sh
On generic linux servers:
cd /etc/csf
sh uninstall.generic.sh
un-installation Completed
ref: http://www.configserver.com/free/csf/install.txt
thanks & regards
tell2humanlinux@gmail.com
Sunday, May 3, 2009
Baseline Monitoring for troubleshooting in Linux!
- troubleshooting
- essential for healthy systems
- help plan for further growth
- can aide with security
Get free Ubuntu stickers ! :)
Thursday, April 30, 2009
How to monitor a system remotely using conky?
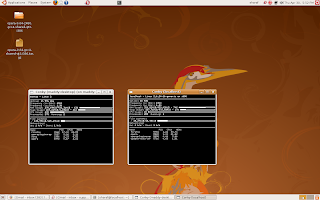
Here are the steps to remotely monitor a linux machine using conky. The example here is done on an Ubuntu Box.
1)Install conky on the system(remote server/system) you need to monitor
sudo apt-get install conky
2)Then install the "xauth" program onto the system(remote server/system) tunneling X (file server)
sudo apt-get install xauth
3)Then we have to edit the ssh server side file /etc/ssh/sshd_config and make sure "X11Forwarding yes" is enabled
4)Then from your local system , you can log into the remote system via SSH with the -X flag. Example:
ssh -X username@192.168.1.100
the user name should be the user of the (remote server/system)
5)once you are logged-in to the remote system, just type conky on the command prompt. You will be able to see the services like:-
- uptime
- frequency
- RAM usage
- SWAP usage
- CPU usage
- Processes
- File systems:
- Networking:
- and currently running processes of the remote system
thanks & regards
tell2humanlinux@gmail.com
Fixing Opera error in Ubuntu!
Is your Opera browser not working on your ubuntu desktop?. Then this post may help you.
In some cases when we click on the opera icon , it wont respond. And if we type 'opera' in the terminal it shows the following error.
human@localhost:~$ opera
ERROR: ld.so: object 'libawt.so' from LD_PRELOAD cannot be preloaded: ignored.
/home/human/lib/opera/9.64/opera: error while loading shared libraries: libqt-mt.so.3: cannot open shared object file: No such file or directory
This happens when some libraries get corrupted ,broken or missing.To fix this just do the following steps.
1)human@localhost:~# sudo apt-get install libqt3-mt
If you get the following message
"You might want to run `apt-get -f install' to correct these:
The following packages have unmet dependencies:
libqt3-mt: Depends: libaudio2 but it is not going to be installed
2)then execute the following comand
human@localhost:~# sudo apt-get -f install
It will automatically install the needed packages and the issue must be fixed by now.
thanks & regards
tell2humanlinux@gmail.com
Sunday, April 26, 2009
How to install AIDE?
Wednesday, April 22, 2009
Antivirus For Linux!

These days I was dealing with some security related packages. I had gone through the changes to be made on IPTABLE to enhance the firewall, and a little bit about SELinux.I came to know about ClamAV, an anti-virus package for Linux..
Clam AntiVirus (ClamAV) is a free, cross-platform antivirus software tool-kit. One of its main uses is on mail servers as a server-side email virus scanner. The application was developed for Unix and has third party versions available for AIX, BSD, HP-UX, Linux, Mac OS X, OpenVMS, OSF and Solaris.
ClamAv has the following features!
- a command line scanner
- automatic database updater
- scalable multi-threaded daemon
- running on an anti-virus engine from a shared library
- a Milter interface for sendmail
- on-demand scanning
- supports many document formats, including Microsoft Office, HTML, Rich Text Format and Portable Document Format.
- It also support for Zip, RAR, Tar, Gzip, Bzip2, OLE2, Cabinet, CHM, BinHex, SIS formats, most mail file formats, ELF executables and Portable Executable files compressed with UPX, FSG, Petite, NsPack, wwpack32, MEW, Upack and obfuscated with SUE, Y0da Cryptor.
The ClamAV virus database is updated several times each day and as of 25 December 2008 contained 479,371 virus signatures.
Latest Stable Release:
Latest ClamAV® stable release is: 0.95.1
Total number of signatures: 545288
ClamAV Virus Databases:
main.cvd ver. 50 released on 15 Feb 2009 16:47 :0500
daily.cvd ver. 9274 released on 22 Apr 2009 13:17 :0400 (on 04/23/09)
Download the production quality stable release here
Download the latest virus database:
main.cvd ver. 50 released on 15 Feb 2009 16:47 :0500
daily.cvd ver. 9274 released on 22 Apr 2009 13:17 :0400
How to install clamAV in Debain ?
The Debian packages are maintained by Stephen Gran. ClamAV has been officially included in the Debian distribution starting from the sarge release. Run apt-cache search clamav to find the name of the packages available for installation.
You can also use one of the Debian volatile repositories to keep your ClamAV installation updated on your system.
Always choose the mirror near to you.
Edit /etc/apt/sources.list and add a line like this to it:
stable/etch:
deb http://volatile.debian.org/debian-volatile etch/volatile main contrib non-free
If you need clamd, you may also want to run apt-get install clamav-daemon
How to install clamAV in Ubuntu?
The Ubuntu packages are maintained by Ubuntu MOTU Developers. ClamAV has been officially included in the Ubuntu distribution since the first Ubuntu release. Run apt-cache search clamav to find the name of the packages available for installation.
The released set (release, *-updates, and *-security) are patched for security updates. Following extensive testing of clamav and the packages that use it in the backports repository, they may be updated to a newer version. These are official Ubuntu packages and supported by community developers.
The Ubuntu backports repository will contain the newest clamav version that has been at least lightly tested to work with that version. These packages can be installed by enabling the backports repository in your system. These are official Ubuntu packages and supported by community developers.
How to install calmAV in Redhat/Fedora ?
Two very good repositories are maintained by Dag Wieers dag at wieers*com:
http://packages.sw.be/clamav/
and Oliver Falk:
SRPMS: http://filelister.linux-kernel.at/?current=/packages/SRPMS/
FC devel: http://rpms.linux-kernel.at/?current=/lkernAT/fedora/core/development/i386
FC 3: http://rpms.linux-kernel.at/?current=/lkernAT/fedora/core/3/i386
RedHat 8.0: http://rpms.linux-kernel.at/?current=/lkernAT/redhat/extras/8.0/i386
How to install clamAV in Mandriva ?
Official Mandriva packages for cooker and supported updates (2006.0 and newer) are maintained by Oden Erikkson. For updates, use the software package manager or urpmi:
urpmi.update—update
urpmi—update—auto clamd
Unofficial packages for current and several older Mandriva distributions are maintained by Bill Randle and are available from his web server.
How to install clamAV in SuSe ?
Official SuSe packages for clamAV are maintained by Reinhard Max.
You can get it from here .
Thanks & regards
tell2humanlinux@gmail.com
Sunday, April 19, 2009
Open Source antivirus - ClamWare .
- Standalone virus-scanner
- Scanning scheduler.
- Automatic virus database updates on a regular basis.
- Context menu integration for Windows Explorer.
- Add-in for Microsoft Outlook.
- And is portable that can be used from a USB flash drive :)
- Extensions availabe to scan file that are downloaded.
- Addin to Microsoft Outlook to remove virus-infected attachments automatically.
- Standalone virus scanner and right-click menu integration to Microsoft Windows Explorer
Saturday, April 18, 2009
nagios installation steps!
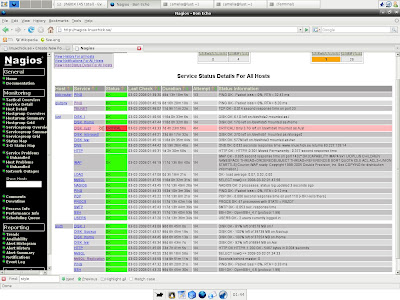
Nagios is a popular open source computer system and network monitoring software application. It watches hosts and services, alerting users when things go wrong and again when they get better.Nagios, originally created under the name NetSaint, was written and is currently maintained by Ethan Galstad, along with a group of developers actively maintaining both official and unofficial plugins.Nagios was originally designed to run under Linux, but also runs well on other Unix variants.Nagios is free software licensed under the terms of the GNU General Public License version 2 as published by the Free Software Foundation.
Download nagios 3.1.0(latest)
As a newbie i decided to install the nagios in my ubuntu 9.04 to monitor my own system services & i succedeed in it. The nagios documentation was pretty simple to follow. But i have written a documentation of my own. This documentaion is for those who are lazy(like me :)) to read whole crap given in the official documentaion.Here i just posted the step by step instllation.
N.B: This is the documentaion for Ubuntu. If need to install on other distros goahead and follow this Documentation.
And use sudo in appropriate places.
Lets begin:
1)Nagios need Apache & gdlibrary to work.
sudo apt-get install apache2 (will install apache 2)
sudo apt-get install build-essential
sudo apt-get install libgd2-xpm
2)Create an Account for nagios
sudo useradd -m nagios ( -m is used to create home if donot exist)
passwd nagios
If you are using server edition do the next step , else skip it and goto a).
/usr/sbin/groupadd nagios
/usr/sbin/usermod -G nagios nagios
a)Create a new nagcmd group for allowing external commands to be submitted through web interfacw. Add both nagios & Apache user to the group.
/usr/sbin/groupadd nagcmd
/usr/sbin/usermod -a -G nagcmd nagios
/usr/sbin/usermod -a -G nagcmd www-data
3)Download nagios & Plugins
mkdir ~/downloads
cd ~/downloads
download the nagios & plugins in this folder(downloads). Extract the package.
wget -c http://osdn.dl.sourceforge.net/sourceforge/nagios/nagios-3.0.6.tar.gz
wget http://osdn.dl.sourceforge.net/sourceforge/nagiosplug/nagios-plugins-1.4.11.tar.gz
Extract the packages:
tar xzf nagios-3.0.6.tar.gz
cd nagios-3.0.6
Run the Nagios configure script, passing the name of the group you created earlier like so:
./configure --with-command-group=nagcmd
Compile the Nagios source code.
make all
make install
make install-init
make install-config
make install-commandmode
4)Don't start Nagios yet, we have to do some more.
Edit the /usr/local/nagios/etc/objects/contacts.cfg config file with your favorite editor and change the email address associated with the nagiosadmin contact definition to the address you'd like to use for receiving alerts.
vi /usr/local/nagios/etc/objects/contacts.cfg
just change the email address you need to receive the alerts.
5)Configure the webinterface.
dont leave the current directory ( ~/downloads/nagios-3.0.6)
make install-webconf
Create a nagiosadmin account for logging into the Nagios web interface. Remember the password you assign to this account - you'll need it later.
htpasswd -c /usr/local/nagios/etc/htpasswd.users nagiosadmin
Restart Apache to make the new settings take effect.
sudo /etc/init.d/apache2 reload (restart)
6)Compile and install nagios plugin
Extract the Nagios plugins..
cd ~/downloads
tar xzf nagios-plugins-1.4.11.tar.gz
cd nagios-plugins-1.4.11
Compile and install the plugins.
./configure --with-nagios-user=nagios --with-nagios-group=nagios
make
make install
7)login to your web interface(Browser)
You should now be able to access the Nagios web interface at the URL below. You'll be prompted for the username (nagiosadmin) and password you specified earlier.
http://localhost/nagios/
type the nagiosadmin username & password
Click on the "Service Detail" navbar link to see details of what's being monitored on your local machine. It will take a few minutes for Nagios to check all the services associated with your machine, as the checks are spread out over time
DONE! :)
For detailed instllation documentation refer: here
thanks & regards
tell2humanlinux@gmail.com
Thursday, April 16, 2009
How to create a local Repository for Linux!
You should have a FTP server or HTTP server to make yum actually working. However since we haven't really gone through setting up FTP or HTTP server, please read-on and understand the process. If you have got vsftpd installed, use that. Otherwise, don't forget to actually set it up yourself later.
Here we will create a local repository for Fedora and CentOS in the easy way.
0. You should have the yum as well as the createrepo package installed first.
1. Create the directory to hold the repository.
mkdir -p /var/ftp/pub/yum-repo/centos/
mkdir -p /var/ftp/pub/yum-repo/fedora/
2. createrepo /var/ftp/pub/yum-repo/centos/ ; createrepo /var/ftp/pub/yum-repo/fedora/ will create the local yum repository by creating a folder named "repodata with four xml files named, filelists.xml.gz, other.xml.gz, primary.xml.gz and repomd.xml
You will have to run the createrepo command each time a rpm is added there.
3. Now in the client's yum.conf, add the repo directly. However in recent versions, the repositories are put in a separate directory called /etc/yum.repos.d/ . If so, put the contents in a filename, with the extension .repo
[humanlinux repo]
name=Fedora Core $releasever - humanlinux Local Repo
baseurl=file:///var/ftp/pub/yum-repo/fedora/
enabled=1
gpgcheck=0
#gpgkey=file:///path/to/your/RPM-GPG-KEY
Fedora Specific Local Repository:-
NB : You can create directories inside /var/ftp/pub/yum-repo/fedora/ to look like /var/ftp/pub/yum-repo/fedora/base/8/i386 , /var/ftp/pub/yum-repo/fedora/updates/8/i386 , /var/ftp/pub/yum-repo/fedora/base/9/i386, /var/ftp/pub/yum-repo/fedora/updates/9/i386 and so on.
1) Filling the repos with RPMs:-
Copy the rpm packages to /var/ftp/pub/yum-repo/fedora/ or /var/ftp/pub/yum-repo/fedora/base/8/i386 from the DVD's Packages directory.
OR
rsync from a rsync supported mirror from the list, http://mirrors.fedoraproject.org//mirrorlists/publiclist/Fedora/8/ like rsync://ftp.sh.cvut.cz/fedora/linux and
rsync -avrt rsync://ftp.sh.cvut.cz/fedora/linux/releases/8/Everything/i386/os/ /var/ftp/pub/yum-repo/fedora/base/8/i386 (remember to have a slash after os/ :-))
2) Updates and regular downloading:-
/var/ftp/pub/yum-repo/fedora/updates/8/i386
rsync the updates from rsync://ftp.sh.cvut.cz/fedora/linux/updates/8/i386/ to /var/ftp/pub/yum-repo/fedora/updates/8/i386
And then enter the command in a cron job too, to download the updates frequently.
Creating Apt repository:-
This is done using the apt-mirror tool. Download and install apt-mirror first and then edit the /etc/apt/mirror.list ( to list which packages tree should be mirrored ) which is similar to /etc/apt/sources.list.
apt-mirror will do the rest of the job. Once it is finished, clean up the repositories by running /var/spool/apt-mirror/var/clean.sh.
tell2humanlinux@gmail.com
Wednesday, April 15, 2009
How to sent gmail from/using terminal!
Here are the steps to sent a gmail using/from the terminal.
1)We have to install a package
for Debain : apt-get install ssmtp
gnu/linux : yum install ssmtp
2)edit the file /etc/ssmtp/ssmtp.conf with your favourite editor.
Add the following lines at the end.
AuthUser=youremailaddress(senders adress)
AuthPass=email password
FromLineOverride=Yes
mailhub=smtp.gmail.com
Use STARTTLS=YES
save & quit!
3)To sent an email, type this on the terminal
echo "This is a test mail' | mail -s "hello" receiptemailaddress@gmail.com
How to turn-on the num lock on every boot-up!
sudo apt-get install numlockx
1)Control the state of NumLock
3)Particularly useful for use with .xinitrc/.xsession or GDM/XDM/KDM sessions
4)Included is an optional script that can be used to start numlockx automatically
in every X session.
thankyou:-
tell2humanlinux@gmail.com
Tuesday, April 14, 2009
How to put .htpasswd protection for a web directory!
- .htaccess
- The .htaccess file is a simple text file placed in the directory you want the contents of the file to affect. The rules and configuration directives in the .htaccess file will be enforced on whatever directory it is in and all sub-directories as well. In order to password protect content, there are a few directives we must become familiar with. One of these directives in the .htaccess file ( the AuthUserFile directive ) tells the Apache web server where to look to find the username/password pairs.
- .htpasswd
- The .htpasswd file is the second part of the affair. The .htpasswd file is also a simple text file. Instead of directives, the .htpasswd file contains username/password pairs. The password will be stored in encrypted form and the username will be in plaintext.
We have to make some changes on the apache conf file, & rester the service.The procedure is explained below.
Creating an .htaccess file:-
goto the directory you need to password protect. create a file named .htaccess.
add the following lines into it.
AuthName "Hello user!"
AuthType Basic
AuthUserFile /usr/local/humanlinux/.htpasswd   (this is the location of the .htpasswd, you have to specify accourdingly)
Require user john  (replace the john with desired username)

Save the file.


Creating an .htpasswd file:-

To create a .htpasswd file in /usr/local/humanlinux

htpasswd -c /usr/local/humanlinux/.htpasswd john

Note the '-c' is only used when creating a new .htpasswd file.
To add dave to an existing .htpasswd file located in /usr/local/humanlinux/ the following command will be used.
htpasswd /usr/local/humanlinux/.htpasswd dave
Sample .htpasswd File
Below is a sample .htpasswd file that contains users john and dave
dave:9fluR/1n73p4c
Changes in the apache conf file:-
AllowOverride All
you have to specify the correct path for the directory you need to pasword protect.Here i have protected the directory /home/humanlinux/public_html/protected.
Restart the apache service.
Troubleshooting
- Make sure that the path specified in AuthUserFile is the correct full path. This is a major cause of problems. If Apache cannot find the .htpasswd file, then all attempts will fail.
- Make sure the permissions on the .htaccess and .htpasswd files are set so that Apache can read them.
- chmod 0644 .htaccess
- chmod 0644 .htpasswd
- Other issues may be out of your control. Web administrators can lock down Apache so that it ignores all .htaccess files it encounters. This can be achieved with an AllowOverride None directive and option on the ServerRoot/DocumentRoot directories. If this is the case (.htaccess not allowed) you will have to kindly ask your web administrator to allow .htaccess files with authorization directives in your personal web directory. This can be achieved with AllowOverride AuthConfig directive and option.
Saturday, April 11, 2009
How to create an account in cPanel!
cPanel is designed to function either as a dedicated server or virtual private server and it supports centOS, Red Hat Linux, and FreeBSD.
Application based support includes Apache, PHP, mySQL, Postgres, Perl, Python, and BIND. Email based support includes POP3, IMAP, SMTP services.
Here are the steps to create an account in cPanel.
1)Login to the whm using your root username and password.
2)to view the currently created accounts , click on 'account information'->list accounts.
3)To create, on the right hand side of the page you can see a menu, click on Account Functions -> Create a new account.
4) give the account details.
Domain name :
user name :
password :
email :
The new account has been created. To goto to the cpanel for the next time for a particular account from whm, goto the account information->list account info.
you will be able to find an icon of cPanel next to the domain.click on that to navigate to the cpanel.
tell2humanlinux@gmail.com
Friday, April 10, 2009
How to install wordpress!
The instllation of wordpress is quite simple.
1)Download the latest version of wordpress and extract it.
2)Place the WordPress files in the desired location on your web server,using FTP
* If you want to integrate WordPress into the root of your domain (e.g. http://example.com/), move or upload all contents of the unzipped WordPress directory (but excluding the directory itself) into the root directory of your web server.
* If you want to have your WordPress installation in its own subdirectory on your web site (e.g. http://example.com/blog/), rename the directory wordpress to the name you'd like the subdirectory to have and move or upload it to your web server. For example if you want the WordPress installation in a subdirectory called "blog", you should rename the directory called "wordpress" to "blog" and upload it to the root directory of your web server.
3)Here i am uploading the folder(blog) to public_html, using ftp. Make sure that you upload the folder as a user, not the root.
4)now goto the cpanel,and create a mysql user and a database.please remember the dbname, user and password.
5)then goto filemanager, inside the uploaded folder (blog), edit the file wp-config-sample.php
6)rename the wp-config-sample.php to wp-config.php.
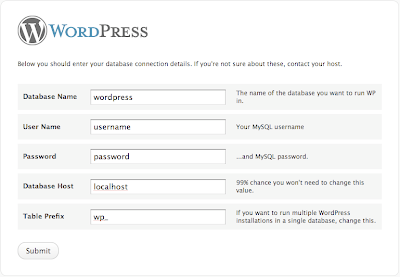
7)edit the wp-config.php and insert the db details of the one which we have created.
Here is the default wp-config-sample.php, you will need to replace the default values in this file with your own specific database settings.
define('DB_NAME', 'putyourdbnamehere'); // The name of the database
define('DB_USER', 'usernamehere'); // Your MySQL username
define('DB_PASSWORD', 'yourpasswordhere'); // ...and password
define('DB_HOST', 'localhost'); // 99% chance you won't need to change this value
usually the DB_HOST must be 'localhost'.if it is not working contact your web hosting provider.
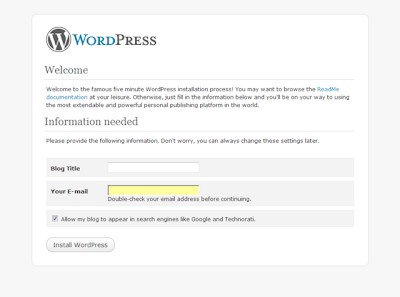
8)Run the WordPress installation script by accessing wp-admin/install.php in your favorite web browser.
* If you installed WordPress in the rootl directory, you should visit: http://example.com/wp-admin/install.php
* If you installed WordPress in its own subdirectory called blog, for example, you should visit: http://example.com/blog/wp-admin/install.php
9)The instllation process will now beging. The screen shots fir the instllation is given below.
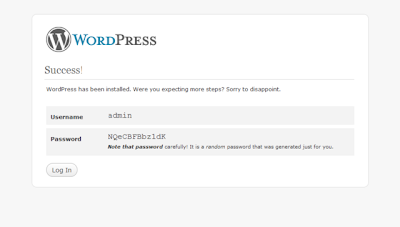
10)goto www.yourdomain.com/blog/wp-login.php to login for the next time.
thankyou
tell2humanlinux@gmail.com
Thursday, April 9, 2009
How to re-register the nameservers from godaddy.com!
We can re-register the nameservers to a different ip's , if we need so. Here are the simple steps to re-register the nameservers from godaddy.com
1)login to godaddy.com
2)click on 'my domains'
3)select your domain name
4)unlock the domain by clicking the lock symbol.
5)then clilck on your domain name
6)navigate to host summary and click on 'edit'
7)insert your new ip assigned for the nameserver,save. you can edit the second nameserver to update the ip.
The 'whois' record will be changed to the new nameserver assigned. You can 'host' to the nameservers to check whether the ip's are updated.
Wednesday, April 8, 2009
OpenDNS!
OpenDNS offers DNS resolution for consumers and businesses as an alternative to using their Internet service provider's DNS servers. By placing company servers in strategic locations and employing a large cache of the domain names, OpenDNS usually processes queries much more quickly, thereby increasing page retrieval speed. DNS query results are sometimes cached by the local operating system and/or applications, so this speed increase may not be noticeable with every request, but only with requests that are not stored in a local cache.
Other features include a phishing filter, domain blocking and typo correction (for example, typing wikipedia.og instead of wikipedia.org). By collecting a list of malicious sites, OpenDNS blocks access to these sites when a user tries to access them through their service. OpenDNS recently launched Phishtank, where users around the world can submit and review suspected phishing sites.
OpenDNS is not, as its name might seem to imply, open source software.
OpenDNS earns a portion of its revenue by resolving a domain name to an OpenDNS server when the name is not otherwise defined in DNS. This has the effect that if a user types a nonexistent name in a URL in a web browser, the user sees an OpenDNS search page. Advertisers pay OpenDNS to have advertisements for their sites on this page. While this behavior is similar to VeriSign's previous Site Finder or the redirects many ISP's are placing on their own DNS servers, OpenDNS states that it is not the same, as OpenDNS is purely an opt-in service (compared to Site Finder's effect on the entire Internet, as VeriSign is an authoritative registry operator) and that the advertising revenue pays for the customized DNS service. Note that web browsers are not the only users of DNS resolution service and for any other user, this way of resolving names is at best useless, and may be worse than replying that the name does not exist, as is normal.
According to OpenDNS, it may in the future provide additional services that run on top of its enhanced DNS service, and may charge money for some of them.
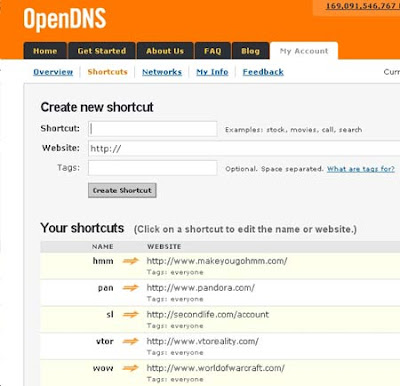
One example of such an added service was the company's April 22, 2007 launch of "shortcuts", letting users make custom DNS mappings, such as mapping "mail" to "mail.yahoo.com". This feature launch was covered by a large number of publications, including the New York Times, Wired, and PC World.
On May 13, 2007, OpenDNS launched a new domain blocking service which provides the ability to block/filter web sites visited based upon categories. This provides for corporate, educational and parental control over the type of sites that are deemed appropriate by the networks owner. On August 9, 2007 OpenDNS added the ability to override the filter through individually managed blacklists and whitelists. On February 20, 2008 in an effort to make their domain block list current with new website additions OpenDNS changed from a closed list of blocked domains to a community driven list whereby individual OpenDNS subscribers can suggest sites for blocking. If a sufficient number of other subscribers concur with the categorization of the site it is added to the appropriate category for blocking. The threshold of votes required to add a new site to the filter has not been disclosed. Over 50 categories now exist for categorizing websites providing for fine grained control over web browsing habits.
visit the official site:- http://www.opendns.com/
the details to setup openDNS is provided in the website.
tell2humanlinux@gmail.com
Friday, April 3, 2009
How to set the Google repository for gnu/Linux.

Command line configuration for RPM.
On an RPM-based system (Fedora, SUSE, Mandriva, RHEL, etc.), download the key and then use rpm to install it.
Run these commands as root:
1) wget https://dl-ssl.google.com/linux/linux_signing_key.pub
2) rpm --import linux_signing_key.pub
You can verify the key installation by running:
3) rpm -qi gpg-pubkey-7fac5991-4615767f
To manually verify an RPM package, you can run the command:
4) rpm --checksig -v packagename.rpm
Command line configuration for YUM
As root, create a file 'google.repo' in /etc/yum.repos.d/ and add the following lines to it.
[google]
name=Google - i386
baseurl=http://dl.google.com/linux/rpm/stable/i386
enabled=1
gpgcheck=1
If your .repo file contains gpgcheck=1, signatures will automatically be verified during installation.
If you are running a 64-bit distribution, you should also add the x86_64 repository, which will provide you with native 64-bit versions of some of google's software:
[google64]
name=Google - x86_64
baseurl=http://dl.google.com/linux/rpm/stable/x86_64
enabled=1
gpgcheck=1
You can then use yum as usual, e.g.
yum install picasa
yum install desktop-backgrounds-basic
Faster YUM search!
1. The connecting location of the client.
2. The current freshness/staleness of the mirrors for that region.
yum fastest mirror plugin (yum-plugin-fastestmirror) sound interesting? Want to try?
To install yum fastest mirror plugin (yum-plugin-fastestmirror) you can use this command:-
yum install yum-plugin-fastestmirror
or
yum install yum-fastestmirror
Once the installation completed, you have to edit the file /etc/yum.conf and add the following line to the file:
plugins=1
If it is already there , no need to add!
Done. you have just installed yum fastest mirror plugin.
if you perform yum install or yum update now,
you will notice there is a new line added like below
Loading “fastestmirror” plugin
Setting up Install Process
Setting up repositories
Happy yumming!
tell2humanlinux@gmail.com


